Saturday, December 26, 2020

T-SQL Transaction Most Basic Example

 BEGIN TRY

                BEGIN TRANSACTION

                                DECLARE @newID INT;


                                --For testing, bad SQL goes here:

                                --INSERT INTO Intake(intake_id, name, pet) VALUES (39,'Ape', 'Dog')


                                --Good SQL goes here:


                                    INSERT INTO Intake(res_name) VALUE("joe");


                                SET @newID =scope_identity();


                                INSERT INTO Intake_ISC_lutb(Intake_ID, ISC_Guid)VALUES(@newID, 'Smedly')


                COMMIT TRAN

END TRY

BEGIN CATCH

                IF @@TRANCOUNT > 0

                                ROLLBACK TRAN

                                --RAISERROR('Error raised in Intake', 16,1)

END CATCH


GridView buttons and commands Delete

 You have a GridView and you want a simple Delete button. What are your options?

Most basic would be to use the CommandField (the Wizard will take you here, too).


Main points are:

In the <asp:Gridview> , after the <columns>, before the <asp:BoundField> items, you would see:

<asp:CommandField ..... (tbd???)


and it is incumbant upon the asp:SqlDataSource to have a section called:

DeleteCommand="" with the actual SQL to be used.


The only other power you have is to include a OnRowDeleted="{create event}" in the <asp:GridView> block, to do something like handle EXCEPTIONS (example: gvResources_RowDeleted).

You can customize how the "Delete" button looks like (Wizard will default to a link that says "Delete" in the same column as Add and Edit, generally in first column) by a bunch of optional properties in the <asp:CommandField> tag:

ButtonType="Image"

DeleteImageUrl="~/Images/deleteIcon.png"

DeleteText="Delete" (default from Wizard)

??? ShowDeleteButton="True" ????


For example, see my Forecast Resources Index page gridview.


The next way to create a "delete button" would be with a ButtonField (or a TemplateField???) but that would be overkill so long as any delete operation can be accomplished with either a SQL statement or even Stored Proc (since the CommandField can also call a stored proc).

However, let's say you prefer to, instead of calling a SQL statement stored in either the ASPX file or SQL Server (for sprocs), but in a data persistence class, maybe a ButtonField is for you.

Seemingly confusingly, to use a ButtonField, you have to specify a handler in the <asp:Gridview block named OnRowCommand="", which sounds like you are using the CommandField!!! 


onrowcommand="CustomersGridView_RowCommand"


<asp:buttonfield buttontype="Button" commandname="DeleteThis" text="Del"/>


.void CustomersGridView_RowCommand(Object sender, GridViewCommandEventArgs e)

{
if(e.CommandName=="DeleteThis") { // Convert the row index stored in the CommandArgument // property to an Integer. int index = Convert.ToInt32(e.CommandArgument); // Get the last name of the selected author from the appropriate // cell in the GridView control. GridViewRow selectedRow = GridView1.Rows[index]; TableCell contactName = selectedRow.Cells[1]; ...


    //do delete


GridView1.DataBind();
etc


I learned that if you use the CommandName="Delete" you will get an error b/c of clash with other functionality.....Also remember to rebind the grid.


Tuesday, December 22, 2020

NuGet Hack

It is possible to also reference DLLs instead of NuGet packages. Change the .nupkg extension of the packages to .zip, unzip them, and extract the DLL files. Then uninstall the NuGet packages from each project and replace them with DLL references.

Tuesday, December 15, 2020

Group Policy: So You Want To Know What the Sys Admins Did To You

 How to See Which Group Policies Are Applied to Your PC and User Account


rsop.msc


(Resultant Set of Policy)


Takes a while to render when you try to expand.


For more:  https://www.howtogeek.com/116184/how-to-see-which-group-policies-are-applied-to-your-pc-and-user-account/


For Remote Desktop timeout info:


Computer Configuration → Administrative Templates → Windows Components → Remote Desktop Services → Remote Desktop Session Host → Session Time Limit.


To Edit Group Policy:

gpedit.msc


Create Database Project in Visual Studio 2017


Here's where you can get a Connection String if you want for later:


It is selectable!


Some options:


Click START.... and....


Click Finish


Friday, November 13, 2020

Visual Studio 2015 Install: 32-bit vs 64-bit, x86 vs x64

 As of this writing, when you go to Visual Studio downloads, you will be presented with either the x86 or the x64, as well as either the EXE or the DVD (an ISO file).


What to do?  We know that even though all machines are 64-bit these days, Visual Studio as of 2015 wasn't really 64-bit ready and proven.  There's a lot of projects in VS2015 that were written on 32-bit machines, too.


Turns out, whether you select x86 or x84, both the EXE and the ISO will download the EXACT SAME FILE.  The filename has both x86 and x64 in the title.


So don't sweat the choice. 

Thursday, November 12, 2020

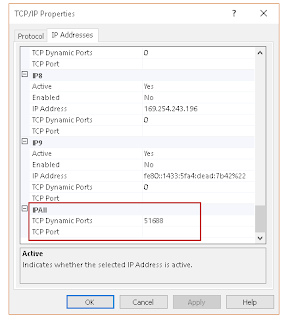
SQL Server: How to find port and instance

 If the default 443 ain't working for you....


1. Open SQL Server Configuration Manager

2. Network Configuration section (you'll also see the INSTANCE names here). Select instance name.

3. It reveals the PROTOCOLS list.  Right click on TCP/IP and select PROPERTIES.

4. Click on the tab "IP Addresses" and SCROLL DOWN to the IP All group.

5. The value in TCP Dynamic Ports is what you want.


Thursday, November 5, 2020

packages.config vs PackageReference

 https://docs.microsoft.com/en-us/nuget/consume-packages/migrate-packages-config-to-package-reference


Visual Studio 2017 Version 15.7 and later supports migrating a project from the packages.config management format to the PackageReference format.

Beware the global.json file

 If you are trying to get a .NET Core project to build, beware that if you have a global.json file in your user folder, it might be overriding any other settings. 


Warning signs are yellow exclamation mark icons in your References and Dependencies, including NuGet (because if you don't have the right SDK you can't get far enough to start updating references).


"The current .NET SDK does not support targeting .NET Core 2.1. Either target .NET Core 1.1 or lower, or use a version of the .NET SDK that supports .NET Core 2.1".


probably could also be any combination.....

"The current .NET SDK does not support targeting .NET Core 2.2. Either target .NET Core 2.1 or lower, or use a version of the .NET SDK that supports .NET Core 2.2".


"The current .NET SDK does not support targeting .NET Core 2.3. Either target .NET Core 2.2 or lower, or use a version of the .NET SDK that supports .NET Core 2.3".


File:


MicrosoftNET.TargetFramework

Line 112


Wednesday, October 28, 2020

MS Word Function Keys


F1

  • F1: Get help. How this works depends on what you’re looking at in the Word window. Press F1 in the regular document window, for example, to open Word’s Help pane. Sometimes, though, pressing F1 takes you to Microsoft’s support site and shows you more targeted articles about the feature you’re looking at. This is the case most of the time when you press F1 while a dialog box is open.
  • Shift+F1: Open Word’s “Reveal Formatting” pane, where you can see the character and paragraph formatting of whatever text you have selected.
  • Alt+F1: Jump to the next field if you’ve got fields in your document.
  • Alt+Shift+F1: Jumps to the previous field in your document.

F2

  • F2: Move text or objects. Select the text or object you want to move and then hit F2. Place your insertion point where you’d like to move the item and then hit Enter.
  • Shift+F2: Copy selected text. It’s just like hitting Ctrl+C.
  • Ctrl+F2: Open the Print window, where you can preview and print your document.
  • Alt+Shift+F2: Save your document. If you haven’t saved your document previously, it opens the Save As window.
  • Alt+Ctrl+F2: Pop up the Open window so you can open a document.

F3

  • F3: Expand an AutoText entry. Type at least the first four letters in the name of your AutoText entry and then press F3 to expand it to the full text.
  • Alt+F3: Create an AutoText entry from selected text.
  • Shift+F3: Change the case of selected text. Pressing this combo repeatedly cycles through the following case styles: Initial Letter Case, ALL CAPS CASE, and lower case.
  • Ctrl+F3: Cut selected text to the Spike. You can cut as much text as you want this way and it all accumulates on the Spike.
  • Ctrl+Shift+F3: Insert the contents of the Spike. Performing this action also clears any text in the Spike.

F4

  • F4: Repeat your last action.
  • Shift+F4: Repeat the last “Find” action. This one’s handy because you can use it to browse search results without having the Find and Replace window or Navigation pane open.
  • Ctrl+F4: Close the current document. You’ll be asked to save the document if you’ve made any changes.
  • Alt+F4: Quit Microsoft Word. This closes all open documents (giving you the chance to save changes first) and exits Word.

F5

  • F5: Open “Go To” tab on the Find and Replace window. You can use this to quickly jump to a page, section, bookmark, and so on.
  • Shift+F5: Jump the previous edit you made in your document. Press it again go one more edit back. Word remembers your last two edits. This works even after saving and closing a document, letting you return to where you left off when you open the document again.
  • Ctrl+Shift+F5: Open the Bookmark window so you can edit bookmarks. If your insertion point is in an existing bookmark, pressing this combo opens the Bookmark window and selects that bookmark.

F6

  • F6: Go to the next pane or frame in your Word window. You can use this to navigate the window without using your mouse.
  • Shift+F6: Go to the previous pane or frame.
  • Ctrl+F6: Go to the next open document window.
  • Ctrl+Shift+F6: Go to the previous open document window.

F7

  • F7: Open the Editor pane and start a spelling and grammar check.
  • Shift+F7: Open the thesaurus. If you have a word selected when you press this combo, Word opens the thesaurus and looks up the selected word.
  • Alt+F7: Find the next spelling or grammar error in your document.
  • Alt+Shift+F7: Open the Translation pane.

F8

  • F8: Enter Word’s selection mode and expand a selection. While in this mode, you can use the arrow keys to extend your selection. You can also press F8 up to five times to extend the selection outward. The first press enters selection mode, the second press selects the word next to the insertion point, the third selects the whole sentence, the fourth all the characters in the paragraph, and the fifth the whole document.
  • Shift+F8: Reduce a selection. This works the same way as expanding a selection, but backward.
  • Ctrl+Shift+F8: Selects a column. Once the column is selected, you can use the left and right arrow keys to extend the selection to other columns.

F9

  • F9: Update a field. This is the same as right-clicking a field and choosing the “Update Field” command.
  • Shift+F9: Reveal a field’s code.
  • Ctrl+F9: Insert new Empty Field {} braces.
  • Ctrl+Shift+F9: Unlink a field.
  • Alt+F9: Toggle the display of a field’s code.

F10

  • F10: Show key tips. Pressing this combo reveals single letter shortcuts you can use to access Word’s menu commands.
  • Shift+F10: Display a context menu. This works just like right-clicking.
  • Ctrl+F10: Maximize document window.
  • Alt+Shift+F10: Display a menu or window for an available selection.

F11

  • F11: Jump to the next field in your document.
  • Shift+F11: Jump to the previous field in your document.
  • Ctrl+F11: Lock a field so it cannot be edited.
  • Ctrl+Shift+F11: Unlock a field.
  • Alt+Shift+F11: Start the Microsoft Script Editor.

F12

  • F12: Open the Save As window.
  • Shift+F12: Save your document.
  • Ctrl+F12: Open the Open window.
  • Ctrl+Shift+F12: Open the Print window.

Also see:  https://www.howtogeek.com/357623/microsoft-word-keyboard-shortcuts-that-make-your-life-easier/

Wednesday, October 14, 2020

Size of Database for SQL Server

 SELECT DB_NAME() AS DbName,

name AS FileName,
size/128.0 AS CurrentSizeMB,
size/128.0 - CAST(FILEPROPERTY(name, 'SpaceUsed') AS INT)/128.0 AS FreeSpaceMB
FROM sys.database_files;

Wednesday, September 2, 2020

Version control

 GitIgnore

Source Control Bindings


SDLC, DevOps: Delivering a Database : State based vs Migration based

 For database development and deployment there are primarily 2 delivery mechanisms — State based and Migration based approach.


State Based Approach


In State based database delivery, you will need to store a snapshot of the current state of the database in your source control. Every table, stored procedure, view, trigger will be saved as separate sql files which will be the real representation of the state of your database objects.


The most important thing to note is that in State based approach the system of truth is the Source Code itself. Application developers would love this because it is very similar to making changes to your class files, compile and build it. Another good thing is that you do not have to deal with ALTER scripts with State based approach 


Migration Based Approach


In Migration Based Database Delivery, when you start working on a project you capture the current state of the database in a single migration script stored inside source control and that becomes the base/initial state.


As the project evolves over time, you will need to make changes to your database schema and reference data. On every instance, you will need to create a migration script with an incremental version number. If you want to determine the current state of your database or recreate the database in another environment, you will need to run all the migration scripts in the correct order.

The system of truth in Migration based approach is the Database itself. This approach provides more fine grain control on your scripts if you have to deal with data intensive operations and TSQL querying. You have the authority to review the scripts which gets executed against your destination database and modify as required.


Hardware: Laptop unresponsive , hard reboot Event Log


The system has rebooted without cleanly shutting down first. This error could be caused if the system stopped responding, crashed, or lost power unexpectedly.


The previous system shutdown at 11:00:55 AM on ‎9/‎2/‎2020 was unexpected.


This is the first Event Log for a reboot:


- <Event xmlns="http://schemas.microsoft.com/win/2004/08/events/event">
- <System>
  <Provider Name="Microsoft-Windows-Kernel-General" Guid="{a68ca8b7-004f-d7b6-a698-07e2de0f1f5d}" />
  <EventID>12</EventID>
  <Version>0</Version>
  <Level>4</Level>
  <Task>1</Task>
  <Opcode>0</Opcode>
  <Keywords>0x8000000000000080</Keywords>
  <TimeCreated SystemTime="2020-09-02T18:16:26.981876100Z" />
  <EventRecordID>15653</EventRecordID>
  <Correlation />
  <Execution ProcessID="4" ThreadID="8" />
  <Channel>System</Channel>
  <Computer>LAPTOPxxxxxxxxxxxx</Computer>
  <Security UserID="S-1-5-18" />
  </System>
- <EventData>
  <Data Name="MajorVersion">10</Data>
  <Data Name="MinorVersion">0</Data>
  <Data Name="BuildVersion">18363</Data>
  <Data Name="QfeVersion">1016</Data>
  <Data Name="ServiceVersion">0</Data>
  <Data Name="BootMode">0</Data>
  <Data Name="StartTime">2020-09-02T18:16:26.500000000Z</Data>
  </EventData>
  </Event>